

Key Takeaways
- The key to faster burpees lies in mastering transition points rather than rushing through individual movements.
- Proper hand placement and body positioning can reduce wasted motion and dramatically increase your burpee speed.
- Using controlled momentum safely can cut seconds off each repetition without sacrificing form.
- Building burpee-specific endurance through interval training produces faster results than traditional cardio.
- Quality equipment like SOLE's mats and conditioning tools can enhance your burpee training environment and support exercises.
Why Most Beginners Struggle with Burpee Speed
Burpees don't have to be your workout nemesis. The truth is, mastering this full-body exercise is less about raw strength and more about technique—especially when you're just starting out.
If you've ever felt like you're moving through molasses during burpees while others seem to float through them effortlessly, you're not alone. Speed comes from smarter movement patterns, not just pushing harder.
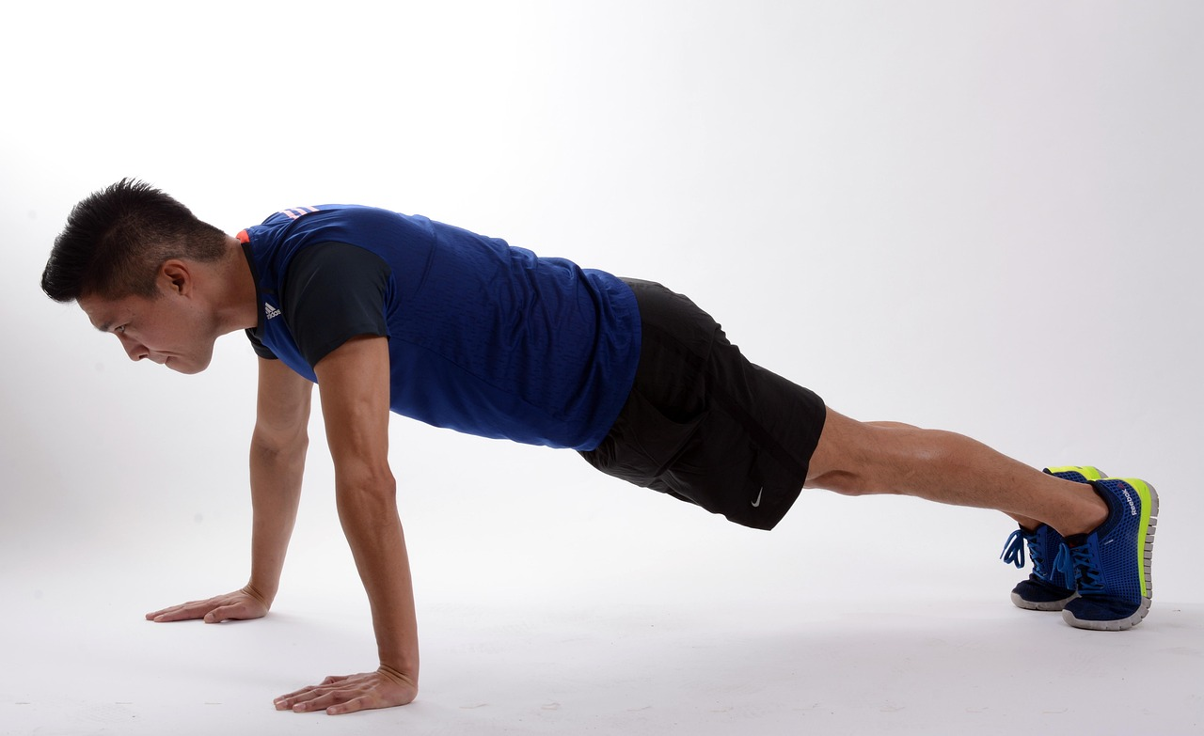
The burpee combines several movements into one fluid exercise: a squat, plank, push-up, and jump. For beginners, the challenge isn't usually any single component; it's the transitions between them.
Most novices pause momentarily between movements, creating "energy leaks" that drain efficiency and speed. These micro-pauses might only be fractions of a second, but they add up quickly when you're doing multiple repetitions.
Another common mistake is rushing through the movements without proper body positioning.
When you drop to the floor too quickly without control, you waste energy repositioning yourself for the next phase. Your body ends up fighting against itself rather than flowing from one movement to the next.
The biggest misconception is that faster burpees come from simply trying harder. The truth is that speed comes from eliminating wasted movement and using momentum strategically.
|
Premium Home Gym Equipment with Award-Winning Quality! Complete Your Home Gym:
Why Choose SOLE: ✓ Commercial-grade quality for home use 30-Day Money-Back Guarantee: Love it or return it, no questions asked. |

Tip 1: Master the Transition Points

Think of burpees as having four key transition points where most beginners lose precious seconds that can be recovered through proper technique.
Think of burpees as having four key transition points: standing to floor, floor to plank, plank to squat, and squat to jump.
Most beginners lose precious seconds at these junctures. The secret to speed is minimizing the time spent in these transitions while maintaining proper form.
Floor-to-Standing Transition Technique
The most challenging transition for beginners is getting from the floor back to the standing position. Instead of pushing up with your arms and then separately bringing your legs forward, combine these movements.
As you push up from the floor, simultaneously shoot your legs forward, landing with your feet just outside your hands. This synchronized movement can save up to half a second per repetition, which adds up quickly during a workout.
Hand Placement for Quicker Movement
Where you place your hands during burpees makes a substantial difference in your speed and efficiency. Position your hands directly under your shoulders rather than out in front of you.
This alignment creates a stronger base and reduces the distance your body needs to travel during transitions. Think of your hands as "speed anchors" that should be positioned to minimize movement rather than maximize it.
Many beginners make the mistake of placing their hands too far forward when dropping to the floor. This forces you to pull your body forward during the push-up portion, wasting valuable energy. Instead, as you drop down, aim to place your hands where your feet just were.
This slight adjustment can significantly reduce the distance your body travels and make each burpee more efficient.
Landing Position That Saves Precious Seconds
The position of your feet when landing from the jump back to the squat position is often overlooked but critically important for speed.
Land with your feet slightly wider than shoulder-width and turned slightly outward at about 15 degrees. This stable position allows you to immediately sink into the next rep without having to adjust your stance.
Practice landing softly with your knees slightly bent to absorb impact. This both protects your joints and stores elastic energy that you can use for the next repetition. Think of your legs as springs that compress on landing and then help propel you into the next movement.
Tip 2: Use Momentum to Your Advantage

Controlled momentum is not the enemy of good form—it's the hallmark of efficient movement when used with proper core stability and joint alignment.
Momentum is crucial for faster burpees, but only when used correctly. Many beginners fear using momentum because they've been told it sacrifices form.
The truth is that controlled momentum is not the enemy of good form. You need to harness momentum while maintaining core stability and proper joint alignment.
The Controlled Fall Technique
Instead of lowering yourself to the ground with pure muscle control, learn to use a controlled fall.
Start by bending your knees and hinging at the hips while reaching your hands toward the floor. Then, allow your body weight to carry you forward while your hands reach to catch you. This technique uses gravity to your advantage rather than fighting against it.
The controlled fall is not simply collapsing to the ground. Your core should remain engaged throughout, and your hands should make contact with the floor before your chest. Practice this movement slowly at first, gradually increasing speed as you gain confidence.
How to Snap Your Legs Forward Efficiently
The movement from plank position back to squat is where most beginners lose significant time.
Instead of stepping your feet forward one at a time, practice explosively driving both feet forward simultaneously. Initiate this movement by lifting your hips slightly higher than the plank position, then pull your knees toward your chest while pushing off with your toes.
A helpful cue is to think about "snapping" your legs forward rather than lifting them. This utilizes your hip flexors and core in a more powerful, coordinated way. Practice this movement in isolation, starting from the plank position and jumping your feet to land outside your hands.
Making Your Jump a Springboard for the Next Rep
The final jump in a burpee isn't just the finish; it's also the setup for your next repetition. As you jump, focus on landing with soft knees that immediately begin bending to initiate the next rep.
This continuous flow eliminates the common beginner mistake of fully straightening after landing, then starting the next rep from scratch.
Tip 3: Build Burpee-Specific Endurance

Burpees require a unique combination of muscular and cardiovascular endurance that can't be developed through traditional cardio alone.
Even perfect technique won't help if you're too exhausted to maintain it. Burpees require a unique combination of muscular and cardiovascular endurance that can't be developed through traditional cardio alone.
Your goal is to build "burpee-specific" conditioning that targets the exact energy systems and muscle groups used during this complex movement.
30-Second Speed Intervals for Beginners
For beginners, one of the most effective training protocols is the 30-second burpee interval. Start with just 10 seconds of maximum-effort burpees followed by 50 seconds of rest.
Focus on maintaining perfect form while moving as quickly as possible during the work interval. As your conditioning improves, gradually increase the work period to 15, 20, and eventually 30 seconds while decreasing rest periods accordingly.
This approach allows you to practice proper technique at high speeds without accumulating excessive fatigue that leads to form breakdown. Aim to complete 6–8 intervals in a session, recording your repetition count for each interval.
Recovery-Based Training Schedule
Many beginners sabotage their burpee progress by not allowing adequate recovery between sessions.
Unlike simple cardio exercises, burpees place significant demands on your central nervous system and multiple muscle groups. For optimal improvement, limit dedicated burpee training to 2–3 non-consecutive days per week.
On recovery days, focus on complementary movements that support burpee performance without duplicating the exact pattern. Low-intensity activities like walking, swimming, or yoga can enhance recovery while maintaining overall fitness.
Complementary Exercises That Boost Burpee Performance
Strategic accessory work can dramatically improve your burpee capabilities. Focus on exercises that strengthen the transition points where most beginners struggle.
Squat jumps improve the explosive standing portion, while plank-to-squat movements target the challenging floor-to-standing transition. Push-up to side planks build the upper body and core stability needed for efficient movement.
Enhance Your Burpee Training with SOLE's Supportive Equipment

SOLE's Equipment Mat provides the stable, cushioned surface essential for rapid floor transitions.
SOLE's Equipment Mat transforms any space into a professional training surface with superior cushioning for your hands and knees during rapid burpee transitions.
The non-slip surface ensures stability during explosive movements, while the easy-clean material handles intense sweat sessions.
For the interval training that builds burpee-specific endurance, SOLE's F80 Treadmill provides precise control for complementary cardio sessions.
Use it for recovery walks between burpee sets or high-intensity intervals that mimic the cardiovascular demands of rapid burpee sequences. The Cushion Flex Whisper Deck reduces impact by 40%, perfect for joint-friendly conditioning that supports your burpee goals.
The SW180 and SW155 Adjustable Dumbbells enhance your supporting strength work with exercises that directly improve burpee performance. The quick-adjust system means you can seamlessly flow between different exercises in circuit-style training that complements your burpee practice.
The SOLE+ App provides structured HIIT workouts, interval timers, and progress tracking that align perfectly with the training methods outlined in this guide. No subscription fees; just professional programming to maximize your burpee improvement.
Frequently Asked Questions (FAQs)
How many burpees should a beginner do in a workout?
As a beginner, quality trumps quantity every time. Start with 3–4 sets of 5–8 burpees with complete recovery between sets. Focus on perfect form and smooth transitions rather than hitting a specific number.
Once you can maintain proper technique throughout all sets, gradually increase either the repetitions per set or the number of sets. A good milestone for beginners is working up to 3 sets of 10 burpees with 60–90 seconds rest between sets.
Will doing burpees faster sacrifice proper form?
Not necessarily. The techniques described are specifically designed to increase efficiency while maintaining proper alignment and control. The key is practicing improved movement patterns at a controlled pace first, then gradually increasing speed as your coordination develops. True speed comes from efficiency, not from rushing or cutting corners on proper movement patterns.
How quickly can I expect to see improvement in my burpee speed?
Most beginners see noticeable improvements within 2–3 weeks of implementing these techniques. Initial gains come primarily from improved coordination and movement efficiency rather than increased fitness. After the first month, progress typically continues at a steady pace as physiological adaptations become the limiting factor rather than technique.
Should I include burpees in every workout?
No, incorporating burpees into every workout isn't necessary or optimal. Including them 2–3 times per week is usually sufficient for significant progress while allowing adequate recovery. Consider making one session focused on technique and control, another on speed and power, and a third on endurance with higher repetitions.
How can SOLE equipment support my burpee training progress?
While burpees are primarily bodyweight exercises, SOLE equipment can significantly enhance your training environment and supporting workouts. The SOLE Equipment Mat provides essential cushioning and grip for floor-based burpees, protecting your hands and knees while ensuring stability during rapid transitions.
For interval training that builds burpee-specific endurance, SOLE treadmills like the F80 offer precise speed and incline control for complementary cardio sessions. The SW180 Adjustable Dumbbells support strength training for muscles used in burpees; squat jumps, push-up variations, and core exercises that directly improve your burpee performance.


Leave a comment
This site is protected by hCaptcha and the hCaptcha Privacy Policy and Terms of Service apply.